February 7, 2024
2 min read

Your First Beginner Leg Day: A Simple, Safe Starting Routine

Scoop, blend, freeze: Check out this homemade high protein pistachio ice cream for a tasty twist on healthy treats!

If you're on the lookout for a yummy treat that fits right into your fitness goals without emptying your wallet, you've stumbled upon the perfect recipe. With so many options for protein-packed ice creams and low-sugar desserts crowding the shelves, it's easy to get overwhelmed. Sure, some of them taste alright, but have you seen the prices? That's why whipping up your own batch of protein ice cream at home is such a game-changer.

Not only does it hit the spot when you're craving something sweet, but it's also a fun twist on the usual protein shake. Plus, you get to say goodbye to all those extra additives and sugars that sneak into store-bought versions.

This homemade pistachio ice cream with vanilla protein powder is the perfect mix of tasty and healthy as well as a great way to cool down after a workout.

Watch the full video: High-Protein Pistachio Ice Cream Recipe

onemor logo blue box
onemorapp
Follow
Original audio
onemor logo blue box
onemorapp We’d love to share with you a yummy and healthy High-Protein Pistachio Ice Cream Recipe made with love. Check-out the easy and step-by-step instructions down below to recreate it and comment if you liked it. 👇🏻

The Ingredients:

-120g unshelled and unsalted pistachios
-280ml milk
-200ml full fat canned coconut milk
-2 tbsp of raw honey
-1/8 tsp salt
-1 tbsp melted coconut oil
-1 scoop of vanilla protein powder
-1 tbsp of melted chocolate

1️⃣ Begin by adding the pistachios to your blender. Change the speed, starting from low and gradually increasing to medium and high until the pistachios break down into small bits.

2️⃣ While blending, slowly pour in the milk. Continue blending until the mixture achieves a smooth and creamy consistency, free of any chunks.

3️⃣ Incorporate all the remaining ingredients, except for the chopped pistachios, and blend until everything is thoroughly combined.

4️⃣ If you have an ice cream machine, transfer there.

5️⃣ In case you don’t have an ice cream machine, here’s what to do: Place the mixture into a metal or glass container, and cover it with parchment paper. Gently press the parchment paper down onto the ice cream to prevent any air from getting in during the freezing process. Then, put it in the freezer.

6️⃣After about 2 hours, take the container out of the freezer and give the mixture a good stir. Add in the chopped pistachios during this mixing step, as it will help prevent ice crystals in the final product.

7️⃣ Cover the container again and return it to the freezer for a 24-hour freeze.

8️⃣ The following day, remove the ice cream from the freezer and let it thaw for approximately 15 minutes, until it’s easy to scoop and dip it in somemelted chocolate

Enjoy your homemade pistachio ice cream! 🍨🥄

Follow @onemor.app for more nutrition content.


#onemor#friday#healthy#recipe
#icecream#nutrition#foryoupage
#trending

3w

Let’s get to it:

Ingredients:
-120g unshelled and unsalted pistachios
-280ml milk
-200ml full fat canned coconut milk
-2 tbsp of raw honey-1/8 tsp salt
-1 tbsp melted coconut oil-1 scoop of vanilla protein powder
-1 tbsp of melted chocolateInstructions:

1️⃣ Begin by adding the pistachios to your blender. Change the speed, starting from low and gradually increasing to medium and high until the pistachios break down into small bits.

2️⃣ While blending, slowly pour in the milk. Continue blending until the mixture achieves a smooth and creamy consistency, free of any chunks.

3️⃣ Incorporate all the remaining ingredients, except for the chopped pistachios, and blend until everything is thoroughly combined.

4️⃣ If you have an ice cream machine, transfer there.

5️⃣ In case you don’t have an ice cream machine, place the mixture into a metal or glass container, and cover it with parchment paper. Gently press the parchment paper down onto the ice cream to prevent any air from getting in during the freezing process. Then, put it in the freezer.

6️⃣ After about 2 hours, take the container out of the freezer and give the mixture a good stir. Add in the chopped pistachios during this mixing step, as it will help prevent ice crystals in the final product.

7️⃣ Cover the container again and return it to the freezer for a 24-hour freeze.

8️⃣ The following day, remove the ice cream from the freezer and let it thaw for approximately 15 minutes, until it’s easy to scoop and dip it in some melted chocolate.

There you have it: delicious, healthy and protein-packed homemade pistachio ice cream! The best part about this recipe is that you can customize it with whatever flavors you’d like. Whether you're in the mood for something fruity, chocolatey, or even more nutty, you can tweak this base to suit your cravings. It's a wonderful way to enjoy a treat that's not just good, but also good for you. After all, who said healthy eating couldn't be fun and delicious?

download for free

Your First Beginner Leg Day: A Simple, Safe Starting Routine

Check out this healthy and nutritious high-protein smoothie recipe to keep your day going right.

Hey there! Ready to whip up something super tasty and good for you?

If you were looking for a sweet and healthy snack to keep you full throughout the day or something to have after a workout, then you’re in the right place. High-Protein smoothies and shakes are not just delicious, but they’re also great for your health. It's all about mixing some cool ingredients like banana, avocado, blueberries, and a bit of protein powder to keep you powered up.

Whether you're looking to get more muscles or just want a sweet treat that's good for you, this protein packed smoothie has got your back.

Why You'll Love This Smoothie

  • Protein Powder: With whey protein in the mix, this smoothie is perfect for keeping your muscles happy, especially after a workout.

  • Good Fats: That creamy avocado? It's full of healthy fats that are great for your heart.

  • Berry Goodness: Blueberries aren't just tasty; they're full of antioxidants that keep your body feeling great.

  • Energy Boost: Bananas are awesome for a quick energy pick-me-up, plus they make your smoothie sweet and smooth.

WATCH THE FULL VIDEO: High-Protein Smoothie with Banana, Avocado and Blueberries

Ingredients:
- 250 ml whey
- 1 ripe banana
- 1/4 avocado
- 30g blueberries
- 1 scoop vanilla whey protein
- 1 scoop hazelnuts

Instructions:
Begin with 250 ml of whey in your blender.
Add a ripe banana and a quarter of an avocado for sweetness and smoothness.
Include a generous portion of blueberries for a flavor kick.
Mix in a scoop of vanilla whey protein and a scoop of hazelnuts to enhance the nutty, creamy texture.
Blend until smooth and enjoy the rich, satisfying taste!

Customize Your Smoothie

The beauty of this smoothie lies in its versatility. Here are a few ways to tweak it to your liking:

Vegan-Friendly: Substitute whey protein with a plant-based protein powder and use almond milk or coconut water as the liquid base.
Boost Fiber: Add a tablespoon of chia seeds or flaxseeds to increase fiber content, which can aid in digestion and keep you feeling full longer.
Increase Antioxidants: Swap blueberries for mixed berries or add a handful of spinach to pack in more antioxidants without compromising taste.

This banana and avocado protein smoothie is more than a tasty drink; it's a way to fuel your body right, whether you're hitting the gym hard or just need a healthy snack.

So, blend it, sip it, and enjoy the good vibes it brings to your day!

download for free
June 5, 2025
1:30 min read

Your First Beginner Leg Day: A Simple, Safe Starting Routine

Let’s settle the debate: does the time of day you work out actually matter?

We all have our preferences—some people jump out of bed ready to train fitness, while others don’t hit their stride until after sunset. But when it comes to getting real resultsmuscle, weight loss, strength, or overall wellness—does the time of day you workout actually matter?

Whether you're squeezing in dumbbell workouts before your morning coffee or closing the gym with a post-dinner grind, this guide will help you decide what works best for your lifestyle and your goals.

Let’s settle the debate once and for all: early morning vs. late night workouts—which one wins?

🌅 The Case for Morning Workouts

✅ Boosts Energy for the Day

Starting your day with a workout can increase focus, productivity, and overall mood. Morning sessions help you feel accomplished before most people are even awake.

✅ Improves Consistency

Fewer distractions = fewer excuses. Morning routines tend to be more repeatable and easier to stick to long term.

✅ May Help With Weight Loss

Some studies show fasted training may boost fat burning (if done safely and under guidance from a coach or personal trainer).

💡 With the Onemor app, you can schedule your morning training sessions in your planner, follow short routines, and even track performance before breakfast.

Download for free
Download for free

🌙 The Case for Late Night Workouts

✅ Strength Peaks Later in the Day

Your body is naturally warmer and looser in the evening, which can improve performance and reduce injury risk during exercise—especially workouts for men focusing on power and muscle gains.

✅ Great for Stress Relief

After a long day, a workout can help you decompress, clear your mind, and sleep better.

✅ Flexibility for Busy Schedules

Not everyone can rise at 5 AM. Night sessions allow more time to warm up, fuel properly, and really commit to your fitness goals.

💡 Use Onemor to find a suitable evening workout app routine from the comfort of your living room, office, or even hotel room.

Download for free
Download for free

🧠 So… Which One Is Better?

The truth is - the best time to workout is the time you can consistently stick to.

🌞Morning Workouts

Best for :

Habit-building, discipline, early energy

Downside :

Early wake-up, colder joints

Ideal for :

Busy professionals, parents, early risers

🌜Night Workouts

Best for :

Strength training, flexibility, stress relief

Downside :

Can disrupt sleep if done too late

Ideal for :

Night owls, shift workers, gym closers

🌞Morning Workouts

🌜Night Workouts

Best for:

Habit-building, discipline, early energy

Strength training, flexibility, stress relief

Downside:

Early wake-up, colder joints

Can disrupt sleep if done too late

Ideal for:

Busy professionals, parents, early risers

Night owls, shift workers, gym closers

Need help choosing? Let Onemor personalize your schedule. Whether you train at 6 AM or 9 PM, you can find the right exercise, log it with a tracker, and follow a trainer plan based on your goals.

Download for free
Download for free
March 24, 2026
5 min read

Try Not to Cry Week Is Here — and Onemor Is Daring You to Show Up

Seven days. Six workouts. One habit. And if you finish — 70% off a year of having a real coach plan your training for you.
That's the Onemor Try Not to Cry Week. Running from March 30th to April 5th, it's not a marketing gimmick or a sponsored post. It's a real challenge, with a real reward, designed for the people who've been saying "I'll start this week" for the last four months.
This week, the starting line is right in front of you. Here's everything you need to know.

🔥  THE CHALLENGE: Train 6 times between March 30 and April 5. Complete all 6 and unlock 70% off Onemor's annual plan — that's areal coach planning your workouts every week for just $4.5/month.

What Exactly Is the Try Not to Cry Week?

The name says it all — this is a week of training that's going to push you. Six sessions in seven days is not easy. It's not supposed to be. The point is to do something your past self would have quit, and your future self will thank you for.

Here's the structure:

  • Dates: March 30 (Sunday) through April 5 (Saturday), 2026

  • Challenge: Complete 6 workouts within that 7-day window

  • Reward for finishing all 6: 70% off Onemor's annual plan

  • Price after discount: $4.5/month — with a real coach planning your workouts every single week

  • Platform: Onemor app —available free on iOS

You can train in the morning, at night, at home, at the gym, or wherever you do your thing. The only rule is that you show up six times. That's it.

📲  Download Onemor free at onemor.com and join the challenge before March 30. Your plan, your coach, your tribe — ready and waiting.

Why 6 Workouts in 7 Days Actually Changes Something

This isn't random. There's real science behind why a week-long challenge structured like this is one of the most effective ways to build a habit that sticks.

It's long enough to feel different

One workout doesn't change your body or your mindset. But six consecutive days of showing up — of making a decision before you feel ready, of doing it tired, of doing it when your schedule is messy — that starts to rewire something. By day six, you're not the same person who almost skipped day one.

It's short enough to commit to

Seven days is a container your brain can wrap itself around. "I'll do this for a week" is a completely different mental agreement than "I'll be consistent forever." One of those feels possible right now. The other feels exhausting before you even start.
That's the genius of the Try Not to Cry Week — it's an invitation, not a life sentence. Start here. See how it feels. Then decide what comes next from a position of strength instead of avoidance.

Discipline compounds

Day 1 you train because of the challenge. Day 3 you train because you don't want to break the streak. Day 6 you train because you've become someone who trains. That's the shift. The challenge is just the door — you have to walk through it.

The Reward: What 70% Off Actually Means

Let's talk about what's on theother side of completing this challenge, because it's worth being specific.

Finishing all 6 workouts unlocks 70% off Onemor's annual plan. That brings the price down to $4.5 per month —which, for context, is less than a single gym class, less than a coffee, and a fraction of what a personal trainer costs in any city in the world.

What you get for $4.5/month:

  • A real coach — not an algorithm — planning your workouts every week

  • A personalized program matched to your goals via Onemor's quiz

  • Follow-along workout videos with pro demonstrations so you always know exactly what to do

  • Access to strength, HIIT, pilates, yoga, and mobility programs

  • Streak tracking, XP, and a leaderboard that makes showing up actually fun

  • A tribe — a community of people training alongside you and keeping you accountable

  • Smart reminders that fit your schedule, not the other way around

Most people spend more than $4.5/month on apps they barely open. This is a coach-built training plan for less than a dollar a week more. The math doesn't need a calculator.

💸  Complete the Try Not to Cry Week and lock in 70% off Onemor Pro — just $4.5/month for a full year of coach-planned workouts. The offer is exclusive to challenge completers. Join at onemor.com.

Who Is This Challenge Actually For?

The Try Not to Cry Week is built for people who are done with the cycle of starting and stopping. Specifically:

  • The person who's been "about to start" for weeks and needs something external to actually begin

  • The person who trains solo and struggles with consistency because there's no accountability

  • The person who keeps paying for fitness apps they don't open

  • The person who knows they'd train more if they had a real plan — not just random YouTube videos

  • The person who wants to see if they can actually do something hard

  • Anyone who's ever thought "I just need to get into a routine" and never did

If any of that sounds familiar —this is quite literally designed for you. Not for the person who's already training six days a week. For the person who needs one good week to prove to themselves they can.

How to Make It Through All 6 Days — Practically

Wanting to complete the challenge and actually completing it are different things. Here's how to make the gap smaller:

  1. Map your 6 sessions before March 30. Look at your calendar right now. Pick 6 slots. Put them in. Don't decide each day — decide once and execute.

  2. Make day 1 non-negotiable.The hardest session is always the first one. If you do day 1, the momentum of not wanting to waste it carries you to day 2.

  3. 1Lower the bar for hard days. A 20-minute session still counts. Showing up at 60% is infinitely better than not showing up at all. Done beats perfect every time.

  4. Tell at least one person. Social accountability is the most underrated consistency tool in existence. Text a friend. Post it. The act of saying it out loud creates a commitment that silence doesn't.

  5. Use Onemor's follow-along player. You don't need to decide what to do — the coach has already decided.Open the app, press play, do the thing.

  6. Remember what's on the other side. 70% off isn't just a discount — it's a year of having someone else handle the planning so you can just show up and train.

This Week Is Bigger Than the Discount

Let's be honest: $4.5/month is a great deal. But the real prize of the Try Not to Cry Week isn't on your credit card statement.

It's the version of you who finishes. The one who proved — not to anyone else, but to themselves — that they can do hard things when they decide to. The one who no longer says "I want to get into a routine" from a place of wishful thinking, but from a place of recent evidence.

That version of you is available.It's one week away. The week starts March 30th. The challenge is on.

❤️🔥  The challenge is on. Will you accept it?Train 6 times between March 30–April 5 on Onemor. Finish all 6 and unlock 70%off — $4.5/month for a coach who plans your workouts every week. DownloadOnemor free and start your journey at onemor.com.

JOIN THE CHALLENGE

Frequently Asked Questions

What is the Onemor Try Not to Cry Week?

The Try Not to Cry Week is a 7-dayfitness challenge run by Onemor from March 30 to April 5, 2026. The challenge requires participants to complete 6 workouts within that window. Users who complete all 6 workouts unlock an exclusive 70% discount on Onemor's annual Pro plan.

What do I get if I complete the challenge?

Completing all 6 workouts unlocks 70% off Onemor's annual subscription plan, reducing the price to $4.5 per month. This gives you 12 months of access to coach-planned workout programs,follow-along training videos, community features, and Onemor's full Pro suite.

How much does Onemor cost after the discount?

After the 70% discount unlocked by completing the Try Not to Cry Week, Onemor Pro costs $4.5 per month (billed annually). This is one of the lowest price points available for an app that provides real coach-planned workouts.

When does the challenge start and end?

The Try Not to Cry Week runs from Sunday, March 30, 2026 to Saturday, April 5, 2026. Participants must complete 6 workouts within this specific 7-day window to be eligible for the reward.

Do the 6 workouts have to be done on specific days?

No. The 6 workouts can be completed on any 6 of the 7 days between March 30 and April 5. The only requirement is completing all 6 within the challenge window.

What kind of workouts are included?

Onemor offers strength training, HIIT, pilates, yoga, mobility, and home workout programs. All workouts are led by real coaches and include follow-along video demonstrations. Programs are personalized based on your goals through Onemor's quiz.

Is Onemor free to download?

Yes. Onemor is free to download on iOS (App Store). The app offers a free tier with daily workout access and a 21-day Pro trial with no credit card required. The Try Not to Cry Week challenge is available within the app.

Who is the Try Not to Cry Week challenge designed for?

The challenge is designed for people who want to build a consistent workout habit, especially those who struggle with motivation or accountability. It is particularly suited to Gen Z users and fitness beginners who want structure, community, and a reward for showing up.

How is Onemor different from other fitness apps?

Onemor is built around a tribe model — members join communities led by real coaches, rather than following generic workout libraries. The app includes gamification (XP, streaks, leaderboards), social accountability features, and personalized program matching. It is specifically designed for Gen Z users who want fitness to feel engaging and social, not transactional.

JOIN THE CHALLENGE
August 22, 2026
4 min read

Your First Beginner Leg Day: A Simple, Safe Starting Routine

Do this beginner leg day today: warm up with several minutes of easy cardio and dynamic movement, then do 3 sets of 8 to 12 reps of goblet squats, Romanian deadlifts, and walking lunges, finishing with glute bridges and calf raises. This works because it hits every major leg pattern (squat, hinge, and single-leg) with just enough volume to build strength without wrecking your recovery.

The whole session runs a moderate length that fits well into a regular workout schedule, including warm-up. Beginners should stick to 3 to 5 exercises per session at 3 sets of 8 to 12 reps rather than chasing a longer list of moves. Your session looks like this:

That’s it. No guesswork, no 15-exercise spreadsheet. Keep reading and we’ll break down exactly why each piece belongs there, plus how to scale it up as you get stronger.

Why Leg Day Actually Matters for Beginners

Your legs hold the biggest muscles in your body, and training them does more than build stronger thighs. Squats, hinges, and lunges recruit your quads, hamstrings, glutes, and calves all at once, which means leg day burns more calories per session than most upper-body work and builds the kind of full-body strength you actually use.

Think about carrying groceries up three flights of stairs, or catching yourself when you trip on a curb. That’s balance and joint stability, and it comes directly from training your legs through a full range of motion. Skip leg day, and you’re skipping the foundation everything else gets built on.

How Should You Warm Up Before a Beginner Leg Workout?

Skip the long static stretching session. Holding a hamstring stretch for 30 seconds before you squat won’t hurt you, but it won’t help your performance either, and research on dynamic stretching shows that 7 to 10 minutes of movement-based warm-up produces better results for explosive strength than sitting in static holds.

Here’s the sequence that works:

International warm-up guidelines back this exact structure, recommending a progression from general movement to specific, task-relevant conditioning rather than jumping straight into heavy work.

Heavy potentiation protocols (sometimes called PAPE) are generally not recommended for beginners because they often depend on higher training experience level, where lifters do a near-max lift before their working sets to “prime” the nervous system. Research shows these protocols depend heavily on training experience, and beginners may not benefit and might even experience temporary performance decline when attempting such protocols.

Pro Tip: If you only have five minutes, prioritize the activation drills over the cardio. Waking up your glutes and quads matters more than raising your heart rate slightly.

What Are the Best Beginner Leg Exercises and How Do You Do Them?

A well-built beginner leg workout needs a bilateral squat pattern, a hip hinge, and a unilateral movement. Programming guidance built around these three patterns covers balance, strength, and injury prevention in one session. Here’s how to execute each one.
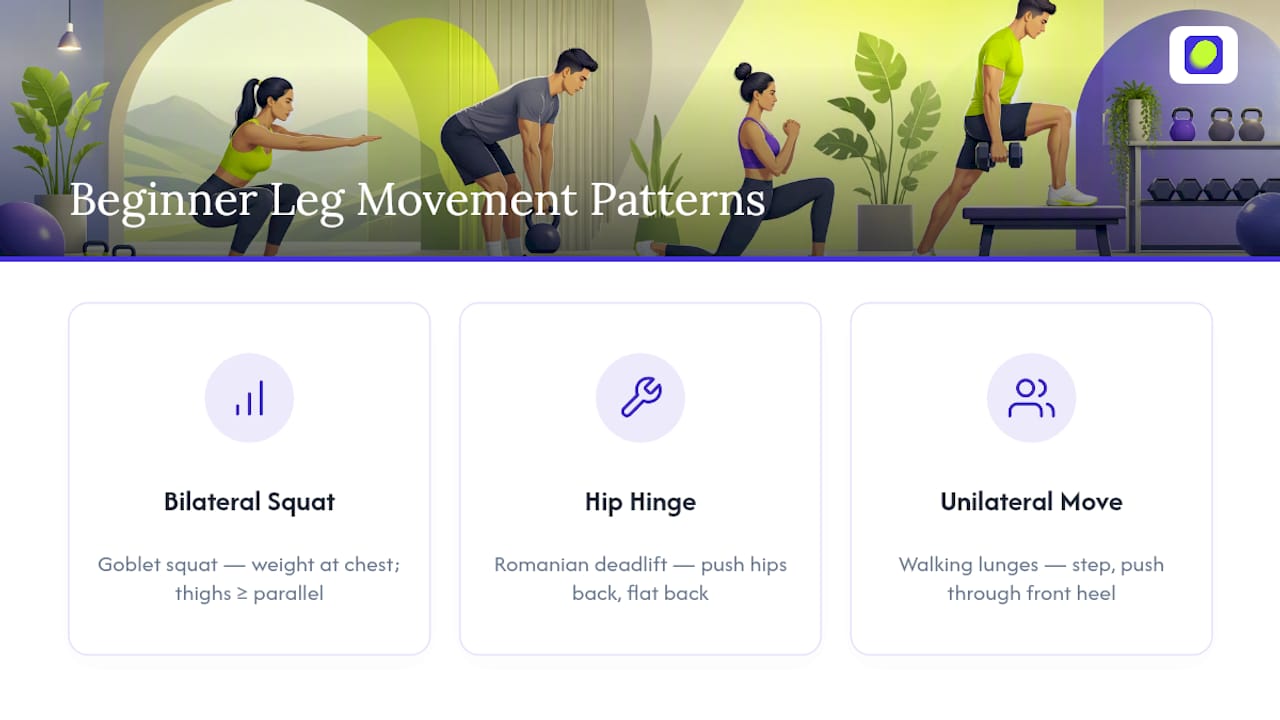
Diagram of beginner leg exercise movement patterns

Goblet squat (bilateral squat). Hold a dumbbell or kettlebell close to your chest, feet shoulder-width apart. Push your hips back and down like you’re sitting into a chair, keeping your chest up and knees tracking over your toes. Aim to get your thighs at least parallel to the floor. Too tough at first? Do a box squat, sitting onto a bench or chair to control the depth. Once bodyweight squats feel easy for 15 reps, add a light dumbbell and build from there.

Romanian deadlift (hip hinge). This is the move most beginners butcher because they squat it instead of hinging. Stand tall, soft knees, and push your hips backward while keeping the weight close to your legs. Your back stays flat the whole time. If you feel it in your lower back instead of your hamstrings, you’re rounding. Start with a hip-hinge drill against a wall (tap your glutes to the wall) before adding a kettlebell for the hinge pattern.
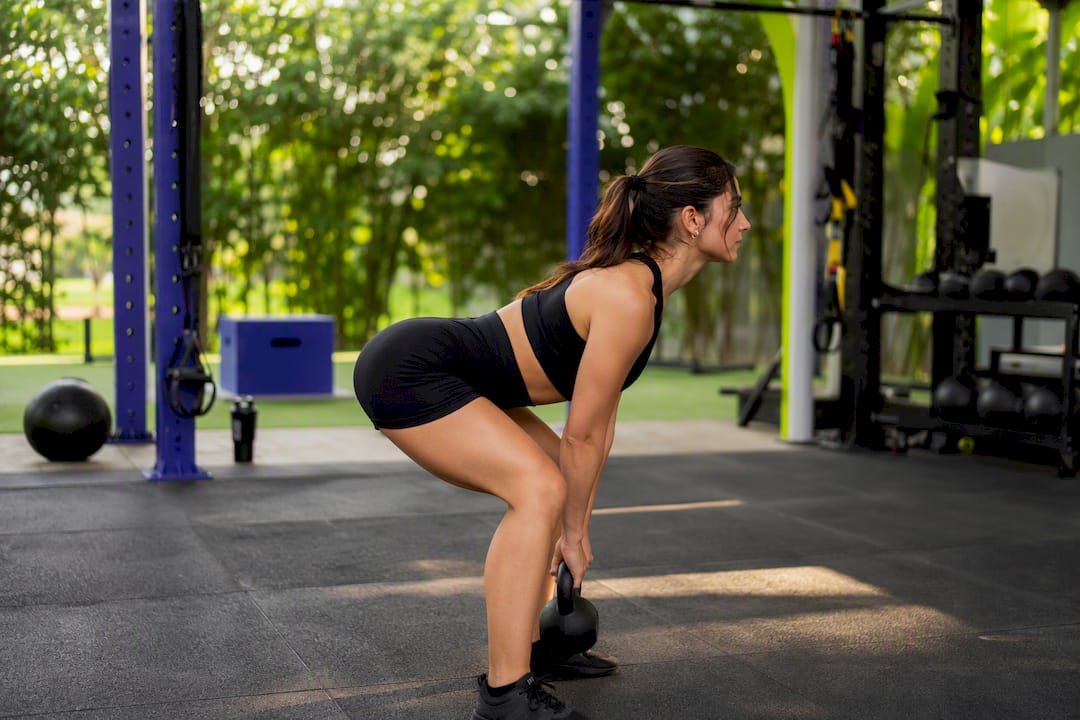
Person practicing Romanian deadlift with kettlebell

Walking lunges or split squats (unilateral). Step forward, drop your back knee toward the floor, and push through your front heel to stand. Keep your torso upright. If balance is an issue, do stationary split squats first before adding the walking version.
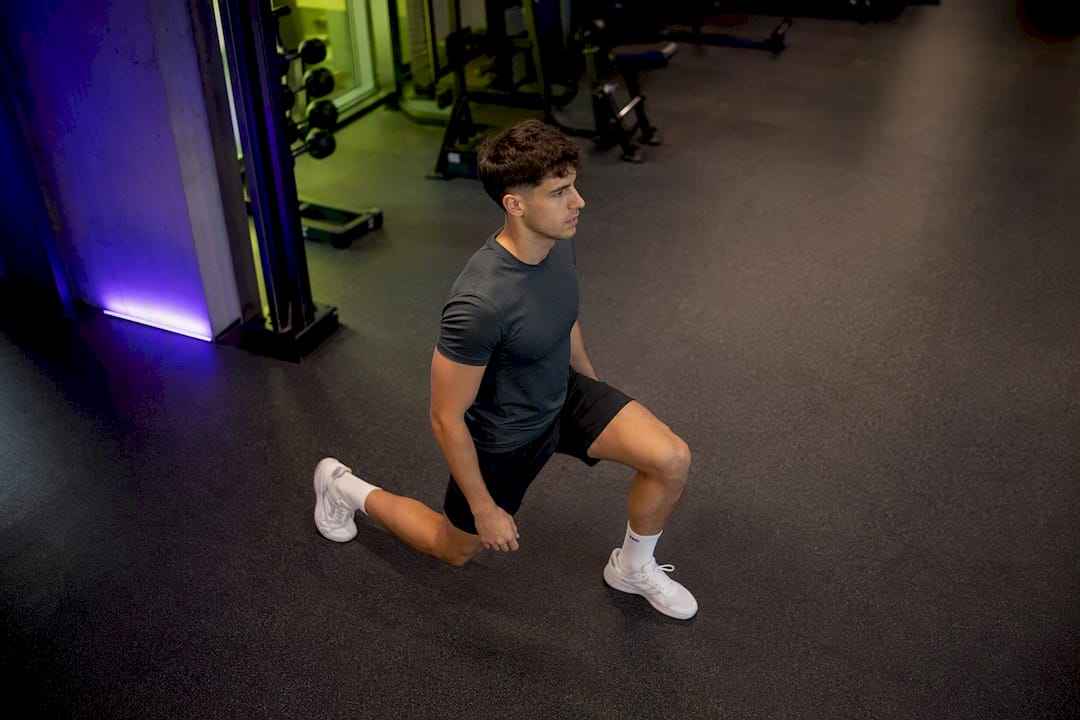
Young adult doing walking lunges in gym

Step-ups. Use a step or bench roughly knee height. Drive through the working leg without pushing off your back foot. Raise the step height as it gets easier.

Glute bridges. Lie on your back, feet flat, and drive your hips up by squeezing your glutes. Progress to single-leg bridges once double-leg bridges feel easy.

Calf raises. Rise onto your toes, pause, then lower slowly. Progress from two-legged to single-leg raises for more range and challenge.

Control your tempo on all of these. A 2 to 3 second lowering phase helps beginners build connective tissue strength and locks in technique before you add real weight.

Pro Tip: Film your squat from the side on your phone once a week. You’ll spot knee cave or back rounding way faster on video than you will mid-set.

Three Beginner Leg Day Routines You Can Copy Today

Pick the version that matches your setup. All three follow the same structure: squat, hinge, unilateral move, then glute and calf finishers.

1. Bodyweight routine (home, no equipment)

2. Dumbbell-only routine (home, minimal equipment)

Start light. A pair of moderate dumbbells goes a long way here, and you can check load progressions in a full dumbbell-only workout plan if you want to build past this starter session.

3. Gym routine

Each of these runs about 35 to 45 minutes including warm-up, and any one of them makes a solid standalone session or a building block inside a longer beginner gym workout plan.

How Often Should Beginners Train Legs and When Should You Progress?

Start with one or two leg sessions per week, and consider using a vibration plate before workout as a quick activation tool to enhance your warm-up routine. That’s plenty of stimulus while your body adapts to a new movement pattern, and it gives your muscles and joints real recovery time between sessions.

Progress when you hit the top of your rep range (12 reps, say) for all three sets with good form. At that point, add a small amount of weight or move to a harder variant, like switching from a box squat to a full goblet squat. Most beginners notice better coordination within the first few weeks, and visible strength gains typically show up around the 8 to 12 week mark with consistent training.

Common Beginner Leg Day Mistakes and Quick Fixes

Your form is the whole game early on. If it breaks down mid-set, that set is over — finishing reps with bad technique trains bad patterns and raises your injury risk for nothing.

Pro Tip: When in doubt, record a set and compare it to how you looked in week one. Progress in form is just as real as progress in weight.

How Onemor Supports This Beginner Approach

We built Onemor around exactly this kind of movement-first thinking. Instead of guessing your way through a workout, you get guided sessions with sets, reps, and rest timers already built in, plus coach cues that match the same squat, hinge, and unilateral patterns covered here.

Alb’s take: a trainer-led, movement-first approach like this is exactly what keeps beginners consistent instead of overwhelmed by choice.

What Beginners Consistently Get Wrong About Leg Day

Most beginner advice online treats leg day like a checklist: hit these five exercises, do three sets, done. What actually separates people who stick with it from people who quit after three weeks is form quality, not exercise selection. You could do the exact routine in this article with sloppy technique and still end up frustrated or hurt.

The bigger gap I see is that most guides skip the regression step entirely. They’ll tell you to do a Romanian deadlift, but not what to do when your back rounds every single rep. That’s the part that actually determines whether you keep training legs or write off “leg day” as something that hurts your knees.

Prioritize the hinge pattern first if you’re picking one thing to nail early. It’s the most commonly botched movement, and it protects your lower back in everything from deadlifts to picking up a suitcase. Everything else in this routine is more forgiving.

Ready to Turn This Routine Into a Real Habit?

Reading a routine is easy. Sticking with it for eight weeks is the hard part, and that’s exactly the gap Onemor closes. Instead of re-reading this article before every session, you open the app and follow a guided beginner leg day with sets, reps, and rest timers already counted down for you, plus streaks and tribe challenges that make showing up on week five feel as automatic as week one.

If you want a coach-led version of the exact patterns covered here, from squat depth cues to hinge corrections, check out programs led by coaches like Branden or browse Onemor’s tribe challenges to train alongside people at your same starting point. Download Onemor and start your first guided leg day this week.

Key Takeaways

A beginner leg day works best with 3 to 5 exercises covering a squat, a hinge, and a unilateral movement, done for 3 sets of 8 to 12 reps with strict attention to form.

PointDetailsKeep the exercise count lowStick to 3 to 5 moves per session so you can focus on form instead of fatigue.Warm up with movement, not static holdsSpend 3 to 7 minutes on dynamic mobility and activation drills before your working sets.Cover three movement patternsInclude a squat, a hip hinge, and a unilateral exercise every session.Progress load only after repsAdd weight once you hit the top of your rep range across all sets with good form.Stop the set if form breaksRegress to an easier variant rather than finishing reps with poor technique.Use Onemor for guided sessionsOnemor pairs this exact routine style with coach cues, timers, and progress tracking.

Frequently Asked Questions


One to two sessions per week is enough to start. Your legs need 48 to 72 hours to recover between sessions, so spacing them out actually speeds up progress rather than slowing it down.


A solid beginner leg day workout includes a squat variation, a hip hinge like a Romanian deadlift, a unilateral move like a walking lunge, and finishers like glute bridges and calf raises, done for 3 sets of 8 to 12 reps.


No. Bodyweight squats, lunges, glute bridges, and calf raises build real strength on their own when you’re starting out. Add dumbbells once bodyweight versions feel easy for 15 reps.


Plan on 30 to 45 minutes total, including your warm-up and cool-down. That’s enough time to complete 5 exercises at 3 sets each without rushing your rest periods.


Yes. Muscle soreness in the first 24 to 48 hours after a new leg workout is common and usually fades within a few days. Sharp joint pain during the workout, though, is a sign to stop and check your form.

Sources

FIND YOUR FREE PLAN
© 2025. All rights reserved. Terms and Conditions  Privacy and Policy
Make Fitness a Lifestyle
You’ll always know exactly what to do, when to do it, and you’ll have friends and coaches pushing you along the way.
Designed and built by Onemor Inc.
Copyright © 2026
Onemor green/yellow icon
Designed and built by Onemor Inc.
Copyright © 2025