Start with foundational moves done for multiple rounds per session, multiple times per week. This combination hits your glutes from multiple angles without needing a single piece of equipment, and it is simple enough to repeat consistently, which matters more than any fancy programming. Try one round right now to feel how your glutes respond.
TL;DR:
- Performing two to three beginner sessions per week, focusing on 8 to 15 reps per exercise, supports muscle growth and prevents overtraining.
- Using household tools like resistance bands, dumbbells, or a sturdy chair can effectively extend progress without gym access.
- Correcting small form errors, such as knee caving or arching the back, and recording videos can improve safety and effectiveness early on.
- Rest days and sufficient sleep are crucial for muscle recovery, especially when training at moderate intensity twice a week.
- Consistent adherence to a simple, progressive routine will produce noticeable strength gains within a few weeks and visible muscle growth after a couple of months.
Cold muscles do not fire well, and glutes are notorious for staying quiet until you wake them up. A short warm-up gets blood moving and teaches your brain to actually use your glutes instead of letting your lower back or quads take over the work.
Spend a minute or two on each of these before your main routine:
Activation drills like the held bridge train your glutes to switch on before you load them with squats and lunges, which tends to mean less compensation from your lower back and better movement quality overall. If you have limited mobility, shrink the range on leg swings and marches, and hold onto a chair for balance during any standing drill.
Pro Tip: Squeeze your glutes hard at the top of every bridge for a full second before lowering. That pause is what teaches the muscle to fire on demand.
These five moves form the core of almost any beginner glute plan, and mastering them gives you a base you can build on for months.
A few cues apply across all five moves:
Beginners often overthink programming when the real key is showing up consistently. Aim for two to three sessions a week, with a rest day between sessions so your muscles can recover and adapt.
For most of the exercises above, work in the 8 to 15 rep range for two to three sets, which is enough stimulus to build strength and tone without overwhelming a body that is still learning the movements.
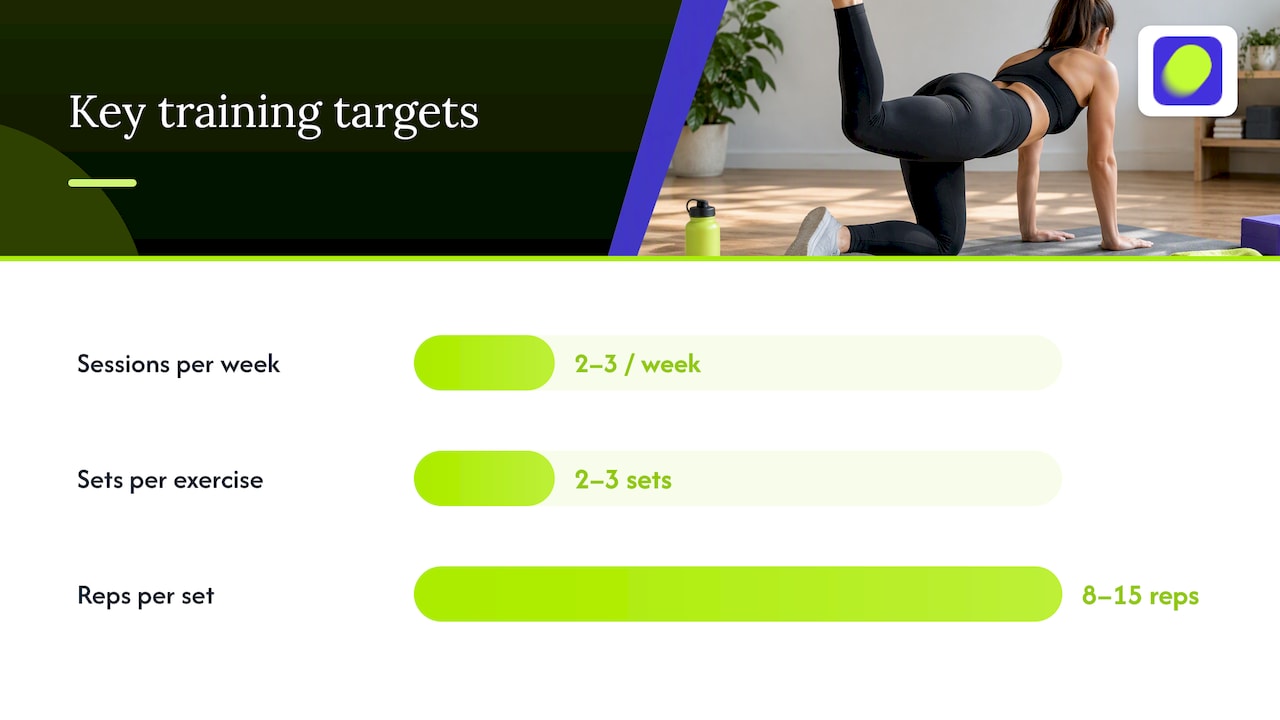
Physical Activity Guidelines recommend muscle-strengthening work for all major muscle groups on two or more days a week, and note that people just starting out should build up gradually rather than jumping into a demanding schedule. The ACSM’s 2026 resistance training guidance echoes this, stating that the best program is the one you will actually stick with consistently, and that training major muscle groups at least twice-weekly is enough to see progress.
A simple progression ladder looks like this:
As for results, research on untrained lifters found that hip thrust and back squat training produced similar increases in glute muscle size over nine weeks, which is a good reminder that no single exercise is magic. You will likely notice strength gains within a few weeks, but visible muscle growth tends to take longer, often a couple of months of consistent training.
You do not need a gym membership to add challenge to this routine. A few inexpensive tools, or things you already own, can extend your progress for months.
Our guide on getting started with resistance bands walks through band selection and setup in more detail if you want to add this low-cost tool to your routine.
Small form errors are common when you are new to these movements, but most have a simple fix once you know what to look for.
Discomfort in the muscle you are working is normal, but sharp pain in a joint is not. If a movement consistently causes pain or your form keeps breaking down despite slowing down, regress to an easier variation or get guidance from a coach.
Pro Tip: Record a short video of yourself from the side during squats and lunges. It is often the fastest way to catch a hip hinge or knee tracking issue you cannot feel in the moment.
Consistency beats complexity, so this plan repeats two simple sessions across four weeks while nudging up the challenge each week.
Track progress by noting whether reps felt easier, whether you added a set, or whether you moved up a variation. If your legs feel consistently sore or performance drops between sessions, add an extra rest day rather than pushing through. Our beginner leg day guide offers more detail on balancing frequency with recovery if you want to extend this plan beyond four weeks.
This routine draws on findings from a systematic review of resistance training and glute hypertrophy, which found that both single-joint and multijoint exercises can build the gluteus maximus, supporting a mixed-exercise approach like the one above. The ACSM’s emphasis on consistency over complexity shaped the programming advice throughout.
This guide was written by Alb for a fitness app that turns these same principles, guided sets, reps, and rest timers, into a structured program you can follow rather than plan yourself. For a deeper look at activation work, see our glute activation warm-up guide.
Training tells your glutes to grow, but food gives them what they need to actually do it. Getting enough protein throughout the day supports muscle repair after each session, and spreading it across meals tends to work better than loading it all at once.
Beyond protein, your body needs enough total calories to build new tissue. Eating in a significant deficit while trying to build muscle tends to work against you, so beginners often do better eating at maintenance or in a small surplus while training consistently.
Carbohydrates matter too, since they fuel the effort you put into each session, and cutting them too aggressively can leave your workouts feeling flat. Staying hydrated and getting enough sleep round out the basics: neither one builds muscle directly, but both affect how well your body recovers and responds to the work you put in.
You do not need to overhaul your diet overnight. Small, sustainable adjustments, like adding a protein source to meals you already eat, tend to stick better than a complete diet rework, and sticking with it is what actually drives results over time.
Your glutes are made up of three muscles, and knowing what each one does helps explain why different exercises feel different in your body. The gluteus maximus is the largest of the three and the main driver of hip extension, the movement you feel in bridges, squats, and lunges when you drive your hips forward.
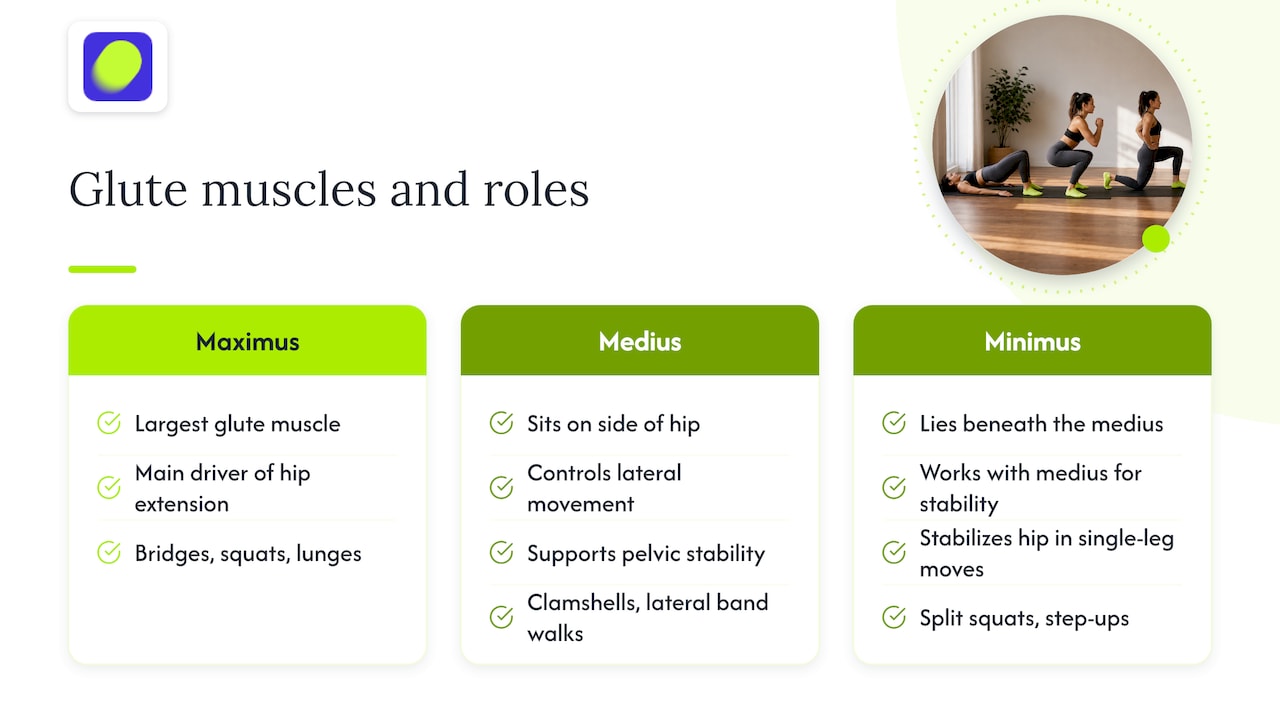
The gluteus medius sits on the side of your hip and controls lateral movement and pelvic stability, which is why moves like clamshells and lateral band walks target it specifically. The gluteus minimus lies underneath the medius and works alongside it to stabilize your hip during single-leg movements like split squats and step-ups.
Training all three matters for balanced strength, not just visible size. A routine built only around forward-and-back movements like squats can neglect the medius and minimus, which is part of why lateral moves like clamshells and donkey kicks earn a spot in this guide alongside bridges and squats.
Muscle growth does not happen during your workout, it happens in the recovery between sessions, which is why the rest day built into this plan is not optional filler. When you train, you create small amounts of stress in the muscle fibers, and your body repairs and builds them back stronger during the hours and days that follow.
Skipping rest days or training the same muscles every day without a break can blunt progress and raise your risk of nagging soreness that never fully resolves. Two to three sessions a week with rest days between them, as recommended throughout this guide, gives your glutes enough stimulus to adapt without overwhelming them.
Sleep plays a bigger role in recovery than many beginners realize, since most of the repair work your body does happens while you are asleep. If you notice your form breaking down more than usual or your motivation dropping, it is often a sign you need more recovery, not more training.
Planning your own sets, reps, and rest periods every week gets old fast, and Onemor takes that off your plate. The app gives you guided beginner glute programs with built-in timers, real coach-led sessions, and progress tracking, so you always know exactly what to do next instead of guessing.
If you would rather follow a guided plan than build your own from scratch, you can start with Onemor’s Free plan and try a beginner glute program today.
Start with a short dynamic warm-up, like hip circles and leg swings, followed by an activation drill such as a glute bridge held for 3 seconds at the top. This wakes up your glutes before you move into squats, lunges, or bridges, and reduces the chance of your lower back taking over the work.
The easiest approach is a short, repeatable bodyweight routine like glute bridges, squats, reverse lunges, and donkey kicks, done two to three times a week. Research on untrained lifters found that different exercises, like hip thrusts and back squats, produced similar glute growth, so the biggest factor is sticking with a plan consistently rather than chasing a specific move.
There is no standardized, widely recognized “8 8 8” method in glute training research or guidelines, so definitions vary depending on the source. If you have come across this term, treat it as one informal approach rather than an established framework, and stick with proven guidance like training major muscle groups at least twice a week in the 8 to 15 rep range.
You can expect noticeable strength gains and improved muscle tone within a month of consistent training, but visible muscle growth typically takes longer. A nine-week trial on untrained participants found measurable increases in glute muscle size with consistent resistance training, which suggests meaningful hypertrophy is realistic over a couple of months rather than a few weeks.